Wednesday, 5 May 2010

Wednesday Inspiration

I have created yet another example card with one of the images from our free Pixie Scenes bundle (see Monday's post how to get it).


I love the image of the old gnarled tree with the Pixie tree house and here I have merged it with no less than seven of our Pixies. After printing I have added Glossy Accent and Stickles here and there for depth. I inked the edges and layered on distressed plain cardstock. The border are Martha Stewart edge and corner punches (Woodland Branch) and I added a little Prima lace and a few pearls (again white pearls that I coloured exactly the green I wanted). That's it! Mega economical card.

Tuesday, 4 May 2010

Pixie Scenes #3

Another Pixie scene example card, we are of course giving a bundled of eight scenes away for free if you have purchased our two Pixie bundles.


After printing the scene I coloured in the grassy area at the front and deepened some of the other colours, plus added a little shade. I added touches of very fine glitter dust to the grass, mushrooms and flower. I inked around the edges with Tim Holtz Dried Marigold.


The scene was layered on brown and orange cardstock (I distressed the edges first with a Tim Holtz paper distresser). The patterned paper is from the Basic Grey Origin 6x6 pad. Again I coloured white pearls with a green marker to get the colour I needed. Prima Roses and Lace.

See yesterday's post for instructions on how to get the free downloads.

-xxx-

Monday, 3 May 2010

Scene 2

I spoke yesterday of the bundle of scenes I created to give to those of you who have purchased out popular Pixie bundles - if you haven't already bought them then why the heck not? They are gorgeous and available world-wide! :-) I gave one example card yesterday and here's another, using another scene from the free bundle:


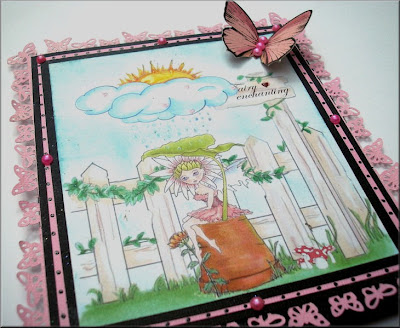
I inked the background with blue distress ink after printing and added a little Glossy Accent here and there. The image is layered on pink and black cardstock. The card is size approx A5.


Butterflies galore here as I created a border using Martha Stewart edge and corner punches: Monarch Butterfly and a K&Co butterfly. The pearls were white pearls that I coloured pink.


So, to get the free scene bundle just email through your order number and we will send you the download link. The scenes are easy to use, just insert into a Word document and resize. There's a re-sizing tutorial HERE.

I've got another example card tomorrow, using another scene, and hope you will pop by then.
Enjoy the rest of the Bank Holiday Monday xx

Sunday, 2 May 2010

All Sewn Up!

I hope you are enjoying the Bank Holiday weekend. True to form it has been bucketing it down, and as I type this Saturday evening the noise from the rain is overwhelming as it drums against the windows. Lets hope the rain lets up just a little so we can get out there and soak up a few rays.

It is the Sunday challenge on our digi stamp challenge blog, if you have any of the Charmed downloads then please pop over and join us, we would really love to see your work.The lovely Nicole set the challenge this week and she wants to see some stitching, any stitching, plus one of our downloads of course.

Now I was in a hurry and just didn't have the time to colour in an image, so I decided to use a compilation of images from our Pixie download bundles that I had made some time ago. This is already coloured in so all I did was print it out. I made a number of these "compilations" and will be giving them to anyone who has purchased both the Pixie bundles, all you have to do is email through your order numbers and I will email the scenes to you.


The stitching here is on the right-hand side where I used raffia ribbon to produce a stitch-like border. I also added a little faux stitching, some of which I glittered with gold dust.


This was an incredibly economical and quick card to make. Here are products used:
Images from our Pixie collections. I used images already coloured.
Plain cardstock for card and matting, and a bit of scrap brown patterned paper for the stitched border.
Gold dust
Raffia, Leaf gems and Pearls - TOP TIP: Colour white pearls with a brown marker pen for instant golden pearls. Use the appropriate hue for the depth of colour you require.

Leaves cut with a Martha Stewart border punch
Holes for my raffia stitching was done with a Martha Stewart Ribbon Threader Border Punch.

Please ignore the white pearls you see above the card in the top right-hand corner - that's another story and they are not part of the card LOL

Thank you for visiting the Charmed corner of the web. Remember that if you have purchased our Pixie bundles you can get the scene I used above by emailing me HERE (we will need your order numbers).

xxx